Showing posts with label dessert. Show all posts

Wednesday, June 17, 2009

Rhubarb Coffee Cake


This week's dessert theme for the Soup Kitchen was Rhubarb Cake. Such a fine fine example of a seasonal dessert. Like beets, brussels sprouts and artichokes, rhubarb is one of those latecomers introduced fairly recently into my adult diet. And like beets, brussels sprouts and artichokes, I think it's simply divine.

For those of you who are rookies to rhubarb, THIS is a complete guide to rhubarb in all its splendor. Since I'm not a big fan of fruit pies and tarts and the sort, I decided to make a rhubarb coffee cake, upon recommendation. It comes direct from Smitten Kitchen via an older issue of the NY Times. Her pictures trump mine by a million, but I've tried to provide a little bit of competition, if you can even call it that. The recipe is as follows:

Time: 1 1/2 hours, plus cooling

Butter for greasing pan

For the rhubarb filling:
1/2 pound rhubarb, trimmed
1/4 cup sugar
2 teaspoons cornstarch
1/2 teaspoon ground ginger

For the crumbs:
1/3 cup dark brown sugar
1/3 cup granulated sugar
1 teaspoon ground cinnamon
1/2 teaspoon ground ginger
1/8 teaspoon salt
1/2 cup (1 stick or 4 ounces) butter, melted
1 3/4 cups cake flour (I was out and used all-purpose and it worked great)

For the cake:
1/3 cup sour cream
1 large egg
1 large egg yolk
2 teaspoons vanilla extract
1 cup cake flour (ditto on the all-purpose flour–worked just fine)
1/2 cup sugar
1/2 teaspoon baking soda
1/2 teaspoon baking powder
1/4 teaspoon salt
6 tablespoons softened butter, cut into 8 pieces.

1. Preheat oven to 325 degrees. Grease an 8-inch-square baking pan. For filling, slice rhubarb 1/2 inch thick and toss with sugar, cornstarch and ginger. Set aside.

2. To make crumbs, in a large bowl, whisk together sugars, spices, salt and butter until smooth. Stir in flour with a spatula. It will look like a solid dough.

3. To prepare cake, in a small bowl, stir together the sour cream, egg, egg yolk and vanilla. Using a mixer fitted with paddle attachment, mix together flour, sugar, baking soda, baking powder and salt. Add butter and a spoonful of sour cream mixture and mix on medium speed until flour is moistened. Increase speed and beat for 30 seconds. Add remaining sour cream mixture in two batches, beating for 20 seconds after each addition, and scraping down the sides of bowl with a spatula. Scoop out about 1/2 cup batter and set aside.


4. Scrape remaining batter into prepared pan. Spoon rhubarb over batter. Dollop set-aside batter over rhubarb; it does not have to be even.

5. Using your fingers, break topping mixture into big crumbs, about 1/2 inch to 3/4 inch in size. They do not have to be uniform, but make sure most are around that size. Sprinkle over cake. Bake cake until a toothpick inserted into center comes out clean of batter (it might be moist from rhubarb), 45 to 55 minutes. Cool completely before serving.

Yield: 6 to 8 servings

I have lost my mind a little bit today and started using a 1/2 tablespoon measuring spoon instead of the 1 tsp portion. I also forgot to dust the top with powdered sugar, which would have made it look immensely better. I guess every cook has her off days, right? Hopefully it tasted as good as it looked....

Thursday, June 11, 2009

Devil's Food Cake with Chocolate Ganache.


As I mentioned in a previous post, I am getting involved with an organization who bakes dessert every Wednesday for a local soup kitchen. I swear these guys who eat here are eating better than I do!

The theme for this week was chocolate cake, and I had decided early on that I wanted to make a good, old fashioned, moist and dense Devil's Food Cake. After toying with the idea of a salted caramel filling, I decided to just take it back and go classic with a bittersweet chocolate ganache (I told you these guys are eating better than I do!)

I've recently become very infatuated with the blogworld of David Lebovitz, so decided to see if his site offered up any hits. Oh yes indeedy, a perfect classic recipe for devil's food cake with chocolate ganache! Sometimes I'll alter the recipe to adjust sugar content or cream content or whatever, but I found this recipe to be simply divine. Here it is, direct from the site:

For the cake:
9 tablespoons unsweetened cocoa powder
1½ cups cake flour (not self-rising)
½ teaspoon salt
1 teaspoon baking soda
¼ teaspoon baking powder
4 ounces (1 stick) unsalted butter, at room temperature
1½ cups granulated sugar
2 large eggs, at room temperature
½ cup strong coffee (or water)
½ cup whole or low-fat milk

For the ganache frosting:
10 ounces bittersweet or semisweet chocolate, coarsely chopped
½ cup water (or cream)
¾ cup (1½ sticks) unsalted butter


1. Adjust the oven rack to the center of the oven and preheat the oven to 350 degrees.


2. Butter two 9" x 2" cake pans and line the bottoms with circles of parchment paper.


3.
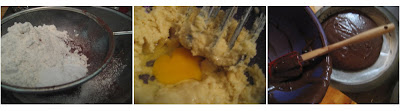
To make the cake layers, sift together the cocoa powder, cake flour, salt, baking soda, and baking powder in a bowl.


4. In the bowl of a standing electric mixer, or by hand, beat together the butter and sugar about 5 minutes until smooth and creamy. Add the eggs one at a time until fully incorporated. (If using a standing electric mixer, stop the mixer as necessary to scrape down the sides to be sure everything is getting mixed in.)


5. Mix together the coffee and milk. Stir half of the dry ingredients into the butter mixture, the add the coffee and milk. Finally stir in the other half of the dry ingredients.


6. Divide the batter into the two prepared cake pans and bake for 25 minutes, or until a toothpick inserted into the center comes out clean. Cool completely before frosting.


steps 3-6. Easy as pie (or cake)

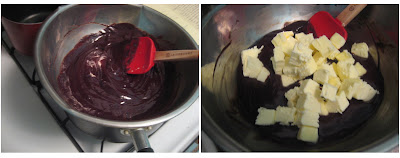
7. To make the frosting, melt the chopped chocolate with the water (or cream) in a heatproof bowl set over a pan of barely simmering water, stirring occasionally until melted. Remove the bowl from the pan of water.


8. Cut the butter into small pieces and whisk them into the chocolate until completely melted and the
ganache is smooth. Cool until spreadable, which may take about 1 hour at room temperature.

ganache-goodness

To frost the cake:


Run a knife around the inside of each of the cakes which will help release them from the pans. Tilt one cake out of the pan, remove the parchment paper from the bottom and invert it back onto a cake plate. Spread a good-sized layer of icing over the top. Top with the second cake layer and spread the top and sides with the remaining icing as decoratively as you want.


Storage: Cake is best the day it is made, although it's fine the next day. Store at room temperature under a cake dome. Just be sure to keep cake out of the
sunin the meantime.

Tuesday, June 2, 2009

Lazy Sundaes

David Lebovitz's CANDIED BACON ICE CREAM

Grrrr I did it again. I've had trouble sleeping lately, and have been falling asleep at annoyingly late hours (3am, 4am) and as a result waking up much later than I ever intend to, not to mention with bags under my eyes. This is something I really wanted to avoid whilst unemployed- just because I don't have a job doesn't mean I don't have (or shouldn't have) things to do! Today I woke up so late that I am embarrassed to tell you exactly what time my clock read when I finally awoke from the restless state that was my slumber. I had huge plans for the day and they were squandered (yes, I really had huge plans), so I shamefully I ended up hanging out at home doing a lot of stuff around the house.

While doing things around the house my mind wandered to ice cream. I've been thinking of ice cream a lot lately. I was never a huge fan of it when I was little, but it's been growing on me through the years. I still prefer a solid vanilla or coffee ice cream over any of those chubby hubby funky monkey ice cream flavors, though. Clean and simple, that's how I like my ice cream.

But recently, I've taken notice to chefs starting to play with their ice creams and using really great ingredients to create what are truly artisanal ice creams and ice cream flavours (I am using the English way of spelling as it seems more delectable and artisinal to me). Nick Morgenstern, chef of the General Greene (and my big fat General Crush) has created an ice cream stand outside of his restaurant with five special daily flavors, flavors like Salted Caramel, Bourbon Raisin, Burnt-Honey Vanilla, and even Bacon! The Van Leeuwan Brothers have made a killing, not only with their truck which silently brings the freshest, most pure and simple flavor all around downtown Manhattan, but now with their packaged cartons selling at Whole Foods stores as well. Sweet Melissa just opened up a creamery, with a nice sit-down parlor-esque restaurant in the back, serving up crazy sundaes and old fashioned delights like Egg Creams (chocolate syrup, heavy cream/mill, and seltzer, hm...).

Since today was the first truly humid day of the year, I was reminded why ice cream fares so well out here in NYC. While in LA I was talking ice cream with Gillian, a very normal foodie conversation. We were thinking of how to re-invent flavors into ice creams, how to make them at their best. S'more Ice Cream! Peanut Butter and Jelly Ice Cream! I think this is why ice cream is so fun and can be so delectable- it's like that part in willy wonka where little Violet Beauregard pops that piece of Wonka Gum in her mouth, which simulated a full course meal- you can recreate the flavors of a whole, solid pumpkin pie, of into a spoonful of creamy, icy goodness! David Lebovitz, true ice cream conisseur, is constantly exploring & writing about such creations and where he finds his flavors and inspirations. He's even written a book on ice cream which I am just dying to get my hands on.

Anyway during my little day dream session I decided that I want to create Caramel Apple ice cream. It's not that I am obsessed with Caramel Apples, or that I love apple products (because I don't, I actually quite despise apple sauce and apple juice and even apple pie), but rather I think that this ice cream would have a really cool flavor profile. Anyway, I will update you if this seemingly genius idea really is genius. Because I have a feeling it'll either be that or a huge disaster. We'll see!

Tuesday, May 5, 2009

Blood Orange Olive Oil Cake


It sounds intimidating, doesn't it? And what is olive oil cake? Who eats olive oil cake? Oh, I do. And you will, too.

The Times featured this recipe mid-march- I remember reading it and thinking "ooh, that sounds interesting", immediately bookmarked it and as most bookmarks in my browser go, it went unread for a good two months (most of the time they are never re-visited). But when it was time to think of a great, portable dish to bring to a picnic two weeks ago, it popped back in my head. Genius! I've really gotta say, this is one of the easiest recipes for cakes I have ever come across. Even easier than banana bread, since you don't have to deal with yucky mushy bananas. And not to say that it's healthy per se, but it really does not use that much sugar, flour, nor any butter- all pluses in my book. I cannot stress how easy it transports, how great it is for picnics and lunches and tea times (because you know we all have tons of those), and really sounds a lot fancier than it is.

It was such a hit at the picnic, you can really taste the rich olive oil flavor, complemented by the nice orang-y lemon zest. Moreover the cake is UNbelievebly moist, like pound cake, but minus the pounds!!!! Anyway I've decided to make it again for a lunch date I have tomorrow with two girlfriends. I added one more orange and nuts to the recipe, as I thought they would be welcomed additions to the already flavorful recipe, and it turned out brilliantly (or at least, it looks that way). It's not exactly blood orange season, but I was able to find the bright little fruits at my local health/gourmet/overpriced food store near my house (at 79cents each. hmph.) I can't cut into it tonight but I PROMISE I will take pictures tomorrow.

without further ado, here is the recipe:

Blood Orange Olive Oil Cake
Prep time, about 30-45 min
Bake time, 50 min-1 hour
+cooling time

Butter for greasing the pan
4 blood oranges
1 cup sugar
greek yogurt (roughly 1/2 cup)
3 eggs
1 3/4 cups all-purpose flour
1 1/2 tsp baking powder
1/4 tsp baking soda
1/4 tsp salt
2/3 cup extra virgin olive oil
1/2 cup walnuts or almonds, optional.

Preheat the over to 350 degrees. Grease a loaf pan (9x5 inch preferred) with butter.

Grate the zest from 2 oranges and place in a large bowl with
sugar. Using your fingers, rub these two ingredients together until the orange zest is evenly distributed in the sugar.

Supreme 2 oranges, break or cut segments up into small pieces, about 1/4 inch in size.

Halve the other 2 oranges and squeeze their juices into a measuring cup. This will equal about 1/4 cup of juice. Add yogurt to the juice until you have 2/3 cup liquid altogether and mix well. Pour this mixture into bowl with sugar and whisk well.

Whisk in 3 eggs, one at a time.

In a smaller bowl, whisk together flour (sifted), baking powder, baking soda, and salt. Gently whisk in dry ingredients into wet ones.

Switch to a spatula and fold in oil a little at a time. Fold in pieces of orange segments, then nuts, if you choose to add them.

Scrape batter into the pan, make sure batter is smooth and compact.

Bake cake for 50-60 min, until it is golden and a knife inserted into the center comes out clean. Cool on rack (in pan) for about 5 minutes, then invert out of the pan and cool until room temperature.

EAT!!

** Like with all baking recipes, I really recommend sifting the flour. Especially if flour has been sitting in your pantry for longer than a few weeks, you'd be surprised to find how clumpy it can get. Since I'm not fancy enough to have a sifter, I just use a fine-meshed sieve and sift the flour about 1/2 cup at a time. Works perfectly.

**In case you don't know how to supreme an orange, or what that even means: Cut off the bottom and the top of your orange so the fruit is just barely exposed and you can sit it upright on a cutting board. With your knife, follow the curve of the fruit and cut away both the peel and the white pithy bitterness. Hold the now naked looking orange in your non-cutting hand, and with the knife (duh) cut the orange segments out of their connective membranes. ta-da!

**Also another tip- don't bother using gross extra virgin olive oil. It's really worth it to use the nicer stuff.